Irresistible Chocolate Peanut Butter Bars: A Decadent Delight
When I think of comfort food, my mind instantly drifts back to my childhood kitchen filled with the rich aroma of warm, baked treats. Among these nostalgic memories, Chocolate Peanut Butter Bars hold a special place in my heart. I can still picture my mom expertly combining peanut butter and chocolate—a duet of flavors that brings a smile to anyone’s face. This recipe is not just another sweet treat; it’s a family tradition I cherish deeply.
What makes my version of these bars stand out? It’s simple: the perfect balance of creamy peanut butter, rich dark chocolate, and a delectable crunchy base. Unlike store-bought snacks, which can be overly sugary, these bars are as wholesome as they are delicious. Plus, they bring back the joy of baking together, creating sweet moments with loved ones.
As you follow along with this recipe, I promise you’ll discover not only a dessert that delights the taste buds but also a way to wrap up your day in comfort. So, roll up your sleeves and get ready to create some delicious Chocolate Peanut Butter Bars that will surely become a favorite!
What Are Chocolate Peanut Butter Bars?
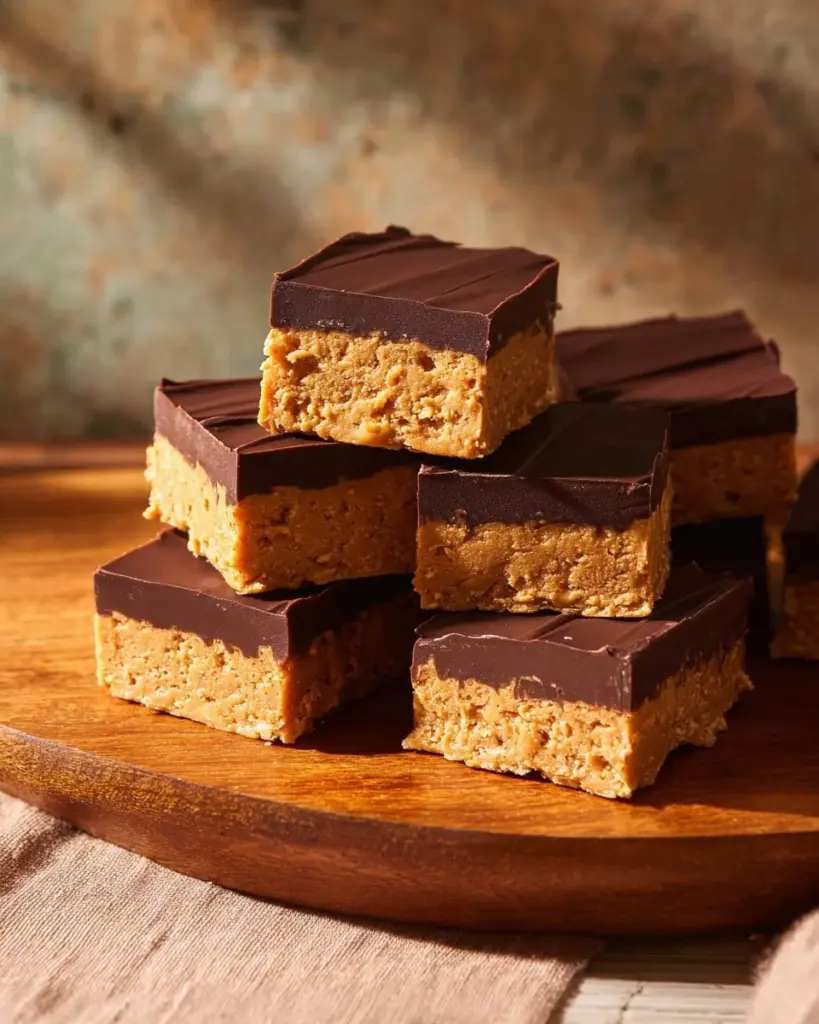
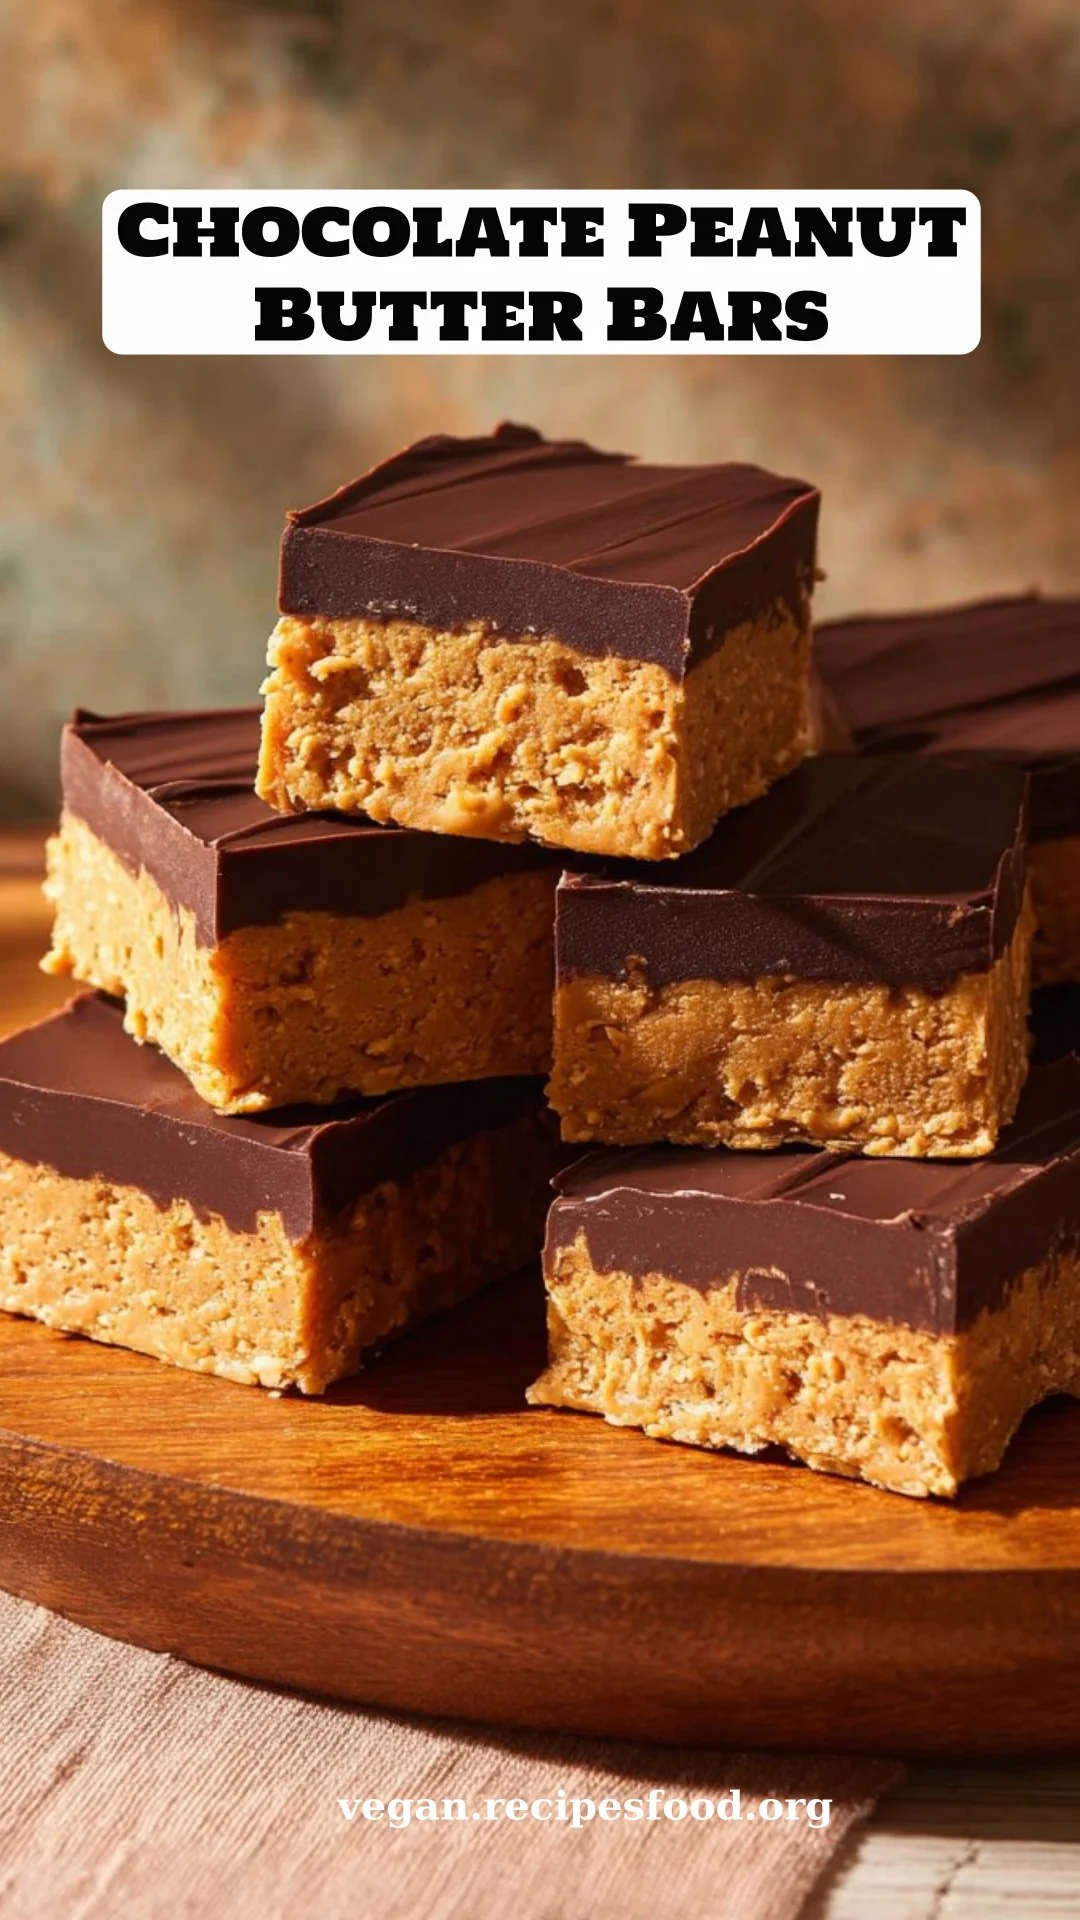
Chocolate Peanut Butter Bars are a harmonious blend of creamy peanut butter and a rich chocolate topping, resting atop a crunchy, cookie-based crust. Their origins can be traced back to family gatherings, potlucks, and bake sales, where they quickly became a crowd-pleaser, thanks to their deliciously sweet, salty, and crunchy profile.
The taste of these bars is pure bliss: they have a luscious, creamy texture from the peanut butter, contrasting perfectly with the crispiness of the cookie crust. Each bite is a delightful explosion of flavors—sweet, salty, and oh-so-satisfying!
These bars are perfect for any occasion, whether you’re looking for a midday snack, a festive treat for a gathering, or simply something sweet to enjoy after dinner. I can assure you, once you start making these, you’ll wonder why you ever settled for store-bought versions!
Why You’ll Love This Recipe
Easy to Make: With minimal ingredients and straightforward instructions, even novice bakers can whip these up! You don’t need extensive kitchen skills—just a willingness to get a bit gooey with those flavors!
Cost-Effective: Making your own Chocolate Peanut Butter Bars is significantly cheaper than buying fancy desserts from bakeries. This recipe allows you to indulge in your favorite flavors without breaking the bank!
Customizable: My recipe serves as a delicious base. Feel free to get creative! Add in some crushed nuts, dried fruits, or even a sprinkle of sea salt on top of the chocolate for some extra flair.
Healthier Options: Why choose store-bought with preservatives when you can opt for this homemade version? You can control all the ingredients, using natural sweeteners and higher quality chocolate to suit your dietary needs.
Make-Ahead Delight: These bars can be made in advance, stored, and enjoyed throughout the week. Just whip them up, pop them in the refrigerator, and serve them when guests arrive!
With just a touch of effort, you can create a treat that’s not only delicious but also far superior to anything you’d find in the grocery store!
Ingredients Section
To make your delicious Chocolate Peanut Butter Bars, gather the following:
- 200 grams natural peanut butter (smooth, preferably an organic brand)
- 50 ml maple syrup (choose pure maple syrup for the best flavor)
- 1 tablespoon non-dairy milk (unsweetened almond or soy works well)
- 3 tablespoons coconut oil (melted and cooled to room temperature, the perfect binding agent)
- 1 teaspoon vanilla extract (a must for that hint of warmth)
- 1/2 teaspoon sea salt (to enhance flavors)
- 150 grams digestive biscuits or graham crackers (crushed to create that delightful base)
- 100 grams dark chocolate (finely chopped; opt for at least 70% cocoa for a richer taste)
- 1 tablespoon natural peanut butter (for the chocolate topping)
- 1 teaspoon coconut oil (to smooth out your chocolate)
Notes on Ingredients:
- For a vegan option, ensure your chocolate is dairy-free.
- If you’re looking for lower sugar alternatives, consider using agave syrup instead of maple syrup.
- Crush the digestive biscuits in a food processor or place them in a zip-lock bag and use a rolling pin.

Step-by-Step Instructions
1. Prepare Your Pan: Line a loaf tin with parchment paper, allowing some overhang for easy removal later. This will make cutting and serving a breeze!
2. Mix Base Ingredients: In a mixing bowl, add the natural peanut butter, maple syrup, non-dairy milk, melted coconut oil, vanilla extract, and sea salt. Whisk together until the mixture thickens slightly—aim for a smooth, creamy consistency.
3. Create the Cookie Crust: Take your digestive biscuits or graham crackers and crush them into fine crumbs. You can do this in a food processor or using a rolling pin over a zip-lock bag. Stir the crumbs into your peanut butter mixture until everything is well combined.
4. Press into the Tin: Pour the mixture into your lined loaf tin and use a spatula to press it down into an even layer. Ensure it’s compact to give you a solid base for your bars.
5. Chill: Pop the loaf tin in the refrigerator for at least 4 hours, or if you’re in a hurry, you can freeze it for 30 minutes.
6. Melt the Chocolate Topping: For the topping, melt the chopped dark chocolate, tablespoon of natural peanut butter, and teaspoon of coconut oil together using a bain-marie (double boiler method). Stir occasionally until the chocolate is silky smooth.
7. Assemble and Chill Again: Pour the melted chocolate over the chilled peanut butter layer, ensuring it spreads evenly. Chill for another 20 minutes for the chocolate to set.
8. Slice and Serve: To slice the bars, carefully lift them out using the parchment overhang and place on a cutting board. Cut into squares—aim for eight generous portions.
9. Store Your Delicious Treats: Keep your bars in a sealed container in the refrigerator for up to one week or freeze for up to three months.
Chef’s Tips:
- Ensure your coconut oil is not hot when you mix it in to avoid melting the peanut butter.
- If you have spare chocolate topping, feel free to dip fresh fruits or pretzels.

Expert Tips & Tricks
Storage: Always store your bars in the refrigerator to maintain their texture. If freezing, ensure they’re tightly sealed to avoid freezer burn.
Make-Ahead: These bars are perfect for meal prep. Make a batch on Sunday and enjoy them throughout the week!
Common Problems: If your chocolate is hard to spread, add a little more melted coconut oil to smooth it out.
Taste Test: Always sample the peanut butter layer before you chill it! Adjust the sweetness with a little more maple syrup if desired.
Variations: Don’t hesitate to swap out the dark chocolate for white chocolate or even milk chocolate, depending on your preferences!
Presentation: Consider garnishing with crushed peanuts or a drizzle of melted chocolate on top for a professional touch.
Serving Suggestions
These Chocolate Peanut Butter Bars are scrumptious on their own, but they shine even brighter with a sidekick! Pair them with:
- A Hot Cup of Coffee: There is nothing quite like the combination of coffee and chocolate!
- Fresh Fruits: Fresh berries or banana slices not only add color but also balance out the richness.
- Ice Cream: Serve with a scoop of vanilla or chocolate ice cream for an indulgent dessert!
These decadent bars are perfect for any occasion—whether it’s a cozy family movie night or a potluck.
Variations & Substitutions
- Nut-Free Version: Use sunflower seed butter instead of peanut butter—an excellent nut-free alternative!
- Flavor Combos: Add in chopped nuts like almonds or walnuts, or mix in some shredded coconut for a tropical twist.
- Seasonal Touch: During the holidays, try adding a hint of pumpkin spice to the peanut butter layer for a festive feel.
Nutrition & Storage Info
- Prep Time: 15 minutes
- Chill Time: 4 hours
- Total Time: 4 hours 15 minutes
- Yield: 8 servings
- Estimated Calories: Approximately 245 calories per bar
- Storage Instructions: Store in the fridge for up to one week or freeze for three months.
FAQ Section
Can I use crunchy peanut butter?
Yes! Crunchy peanut butter will add delightful texture to your bars.What chocolate should I use?
I recommend using at least 70% dark chocolate for a richer flavor but feel free to experiment with your favorites!Can I add protein powder?
Absolutely! You can mix in a scoop of your favorite protein powder into the peanut butter layer for a protein boost.Are these bars vegan?
Yes, as long as you use vegan-friendly chocolate and non-dairy milk!How should I slice the bars?
Use a sharp knife. Run it under warm water before slicing for cleaner cuts.Can I make these gluten-free?
Yes! Just opt for gluten-free digestive biscuits or graham crackers.How long do these last in the freezer?
These bars can be stored in the freezer for up to three months.Can I use a different sweetener?
Yes, agave syrup or honey works—just adjust to taste!What can I substitute for coconut oil?
Unsalted butter or another neutral oil can be used as a substitute for coconut oil.Can I skip the chocolate topping?
While it’s delicious, feel free to enjoy the base bar without it, or even dust with cocoa powder.
Conclusion
In conclusion, these Chocolate Peanut Butter Bars are more than just a recipe; they are a sweet reminder of family traditions and beautiful memories. I encourage you to try making them yourself—you won’t regret it! Your taste buds will be singing praises, and your loved ones will surely ask for seconds.
If you enjoyed this recipe, please leave a comment or share your thoughts! And don’t forget to check out my other dessert recipes on the blog for more sweet inspiration!
Print
Chocolate Peanut Butter Bars
- Total Time: 255 minutes
- Yield: 8 servings 1x
- Diet: Vegan
Description
A harmonious blend of creamy peanut butter and rich chocolate atop a crunchy cookie base.
Ingredients
- 200 grams natural peanut butter
- 50 ml maple syrup
- 1 tablespoon non-dairy milk
- 3 tablespoons coconut oil (melted)
- 1 teaspoon vanilla extract
- 1/2 teaspoon sea salt
- 150 grams digestive biscuits or graham crackers (crushed)
- 100 grams dark chocolate (finely chopped)
- 1 tablespoon natural peanut butter (for topping)
- 1 teaspoon coconut oil (for topping)
Instructions
- Prepare Your Pan: Line a loaf tin with parchment paper.
- Mix Base Ingredients: Whisk together peanut butter, maple syrup, non-dairy milk, melted coconut oil, vanilla extract, and sea salt.
- Create the Cookie Crust: Crush biscuits and mix with the peanut butter mixture.
- Press into the Tin: Pour the mixture into the lined loaf tin and press down firmly.
- Chill: Refrigerate for at least 4 hours or freeze for 30 minutes.
- Melt the Chocolate Topping: Melt chocolate, tablespoon of peanut butter, and coconut oil together until smooth.
- Assemble and Chill Again: Pour chocolate over the peanut butter layer and chill again for 20 minutes.
- Slice and Serve: Lift out with parchment overhang and cut into squares.
- Store: Keep in a sealed container in the refrigerator for up to one week.
Notes
For a vegan option, ensure chocolate is dairy-free. Store bars in the fridge to maintain texture.
- Prep Time: 15 minutes
- Cook Time: 0 minutes
- Category: Dessert
- Method: Chilling
- Cuisine: American
Nutrition
- Serving Size: 1 bar
- Calories: 245
- Sugar: 10g
- Sodium: 200mg
- Fat: 13g
- Saturated Fat: 5g
- Unsaturated Fat: 8g
- Trans Fat: 0g
- Carbohydrates: 25g
- Fiber: 3g
- Protein: 6g
- Cholesterol: 0mg
Keywords: chocolate, peanut butter, dessert, vegan, bars, snacks