
Savory Bruschetta Cheese Ball: The Ultimate Party Pleaser
When I think of gathering with friends and family, there’s always that one dish that brings everyone together—my Bruschetta Cheese Ball. Just the sight of it sitting elegantly on a platter, drizzled with balsamic glaze, evokes warm memories of summer evenings spent laughing, sharing stories, and indulging in carefree bites of deliciousness. It’s a dish that fits perfectly into any party, be it Thanksgiving or a casual get-together, and it’s a recipe that’s always passed down in my family with love.
What makes my Bruschetta Cheese Ball stand out from the crowd? Well, it’s not just about mixing cheeses; it’s the magical medley of fresh basil, zesty sun-dried tomatoes, and a hint of garlic that dances on your taste buds. Each bite offers a creamy, dreamy texture that brings instant joy. Plus, it’s not only easier to make than you’d think, but it also saves you the hefty price tag of gourmet cheese spreads from specialty stores.
In this post, I’ll walk you through my treasured recipe for this cheese ball, ensuring you create a stunning appetizer that will have your guests raving. Get ready to make memories with this Bruschetta Cheese Ball that will surely become a beloved family favorite!
What Are Bruschetta Cheese Balls?
The origin of the bruschetta can be traced back to Italy. Traditionally, it consists of grilled bread topped with a variety of delightful toppings. My Bruschetta Cheese Ball takes that classic concept and transforms it into a festive appetizer that’s just as rich in flavor. The taste is heavenly—creamy cheese combined with fragrant basil and sweet sun-dried tomatoes, all encased in a perfect ball shape that you can slice and scoop.
Each bite delivers a burst of flavor and a wonderful textural contrast, making it a standout dish at any gathering. Whether it’s the holidays, game day, or a simple Sunday brunch, this is the cheese ball you’ll want to whip up. Its versatility makes it suitable for any occasion and a guaranteed crowd-pleaser, no matter who you’re entertaining.
Why You’ll Love This Recipe
Customizable & Fun: One of my favorite aspects of this recipe is its flexibility. While traditional Italian flavors are my jam, you can easily customize this cheese ball. Want to add some spicy jalapeños or perhaps switch out the basil for fresh dill? Go for it!
Economical: Let’s talk costs! Did you know that preparing this Bruschetta Cheese Ball at home is way more cost-effective than buying ready-made versions from fancy delis? You get a gourmet-style dish without feeling guilty about your wallet!
Easy Preparation: You don’t have to be a culinary expert to whip up this showstopper. With a preparation time of just 15 minutes (and a little bit of chilling time), you’ll have a delicious appetizer ready before you know it.
Presentation Power: This cheese ball is not just a treat for the taste buds; it’s a feast for the eyes too. It brings elegance and fun to any table. You can dress it up with additional toppings or serve it with various crackers and fresh veggies for a colorful display.
Make-Ahead Magic: Planning a gathering can be hectic, but did I mention you can assemble this cheese ball a day in advance? Let it chill overnight to develop deeper flavors, so all you’re left to do is drizzle with balsamic glaze before your guests arrive!
Now, let’s dive into the ingredients that will make this Bruschetta Cheese Ball a savory sensation.

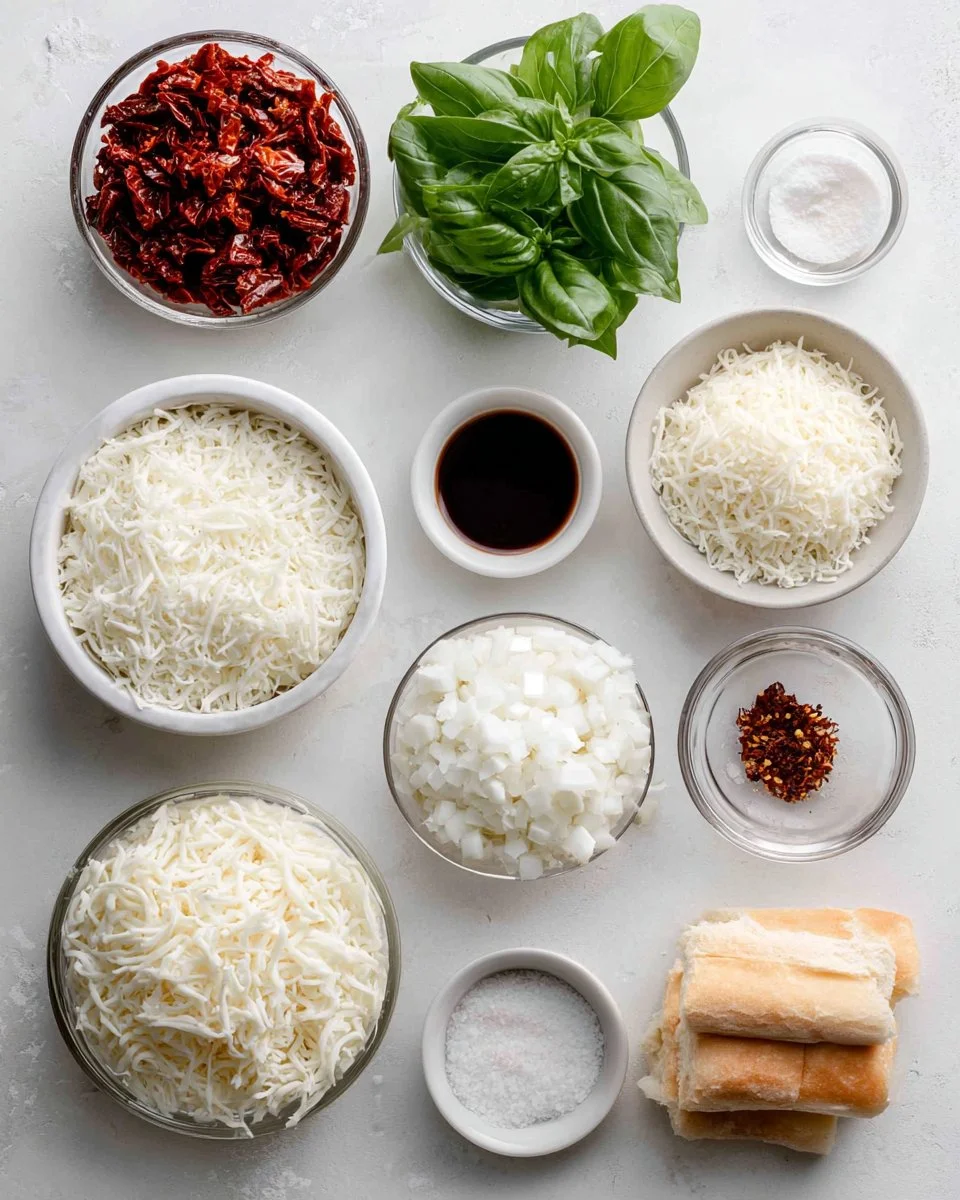
Ingredients
To create this mouthwatering Bruschetta Cheese Ball, gather the following:
8 oz cream cheese, softened: Room temperature allows for easy blending. I recommend using a high-quality cream cheese like Philadelphia, as it creates a rich foundation for the flavors.
1 cup shredded mozzarella cheese: Look for whole milk mozzarella for an extra creamy result.
1/2 cup grated Parmesan cheese: Freshly grated is ideal for maximum flavor. Avoid the pre-grated stuff if you can; it just doesn’t compare!
1/4 cup fresh basil, chopped: Fresh basil is essential for that authentic bruschetta taste. If it’s not in season, you could try using another fresh herb like parsley.
1/4 cup sun-dried tomatoes, chopped: Whether you choose oil-packed or dried, sun-dried tomatoes add a burst of sweetness. If using dried, soak them in warm water to soften before chopping.
1/4 cup diced red onion: This provides a nice crunch and adds a pop of color.
1 clove garlic, minced: Make sure to mince finely to prevent any overpowering garlic flavor.
1/4 cup balsamic glaze for drizzling: A store-bought version is perfectly fine, but if you’re feeling adventurous, I have a homemade balsamic reduction recipe on my blog!
Salt and pepper to taste: Always season according to your preferences.
Crackers or sliced baguette: These will be your dippers! Choose a variety for an appealing platter.
Remember, quality matters! Try to use fresh ingredients, and as always, make adjustments based on your taste preferences.
Step-by-Step Instructions
Bring the cream cheese to room temperature. This simple step ensures that it mixes smoothly with the other ingredients. Let it sit out for about 30 minutes before you start.
In a medium bowl, combine the cream cheese with the shredded mozzarella and grated Parmesan. Blend until mostly smooth. This mixture should be harmonious and homogenous, so don’t be shy with your mixing!
Fold in the chopped basil, sun-dried tomatoes, diced red onion, and minced garlic. Season with salt and pepper. This is where the magic happens—taste as you go! If you feel it needs more garlic or a pinch of salt, now’s your chance!
Shape the mixture into a tight ball. Wrap it in plastic wrap and press gently to ensure a perfect round shape. You can even use parchment paper for an easier release later.
Refrigerate for at least 2 hours, or overnight for deeper flavor melding. The longer it sits, the more the flavors develop!
Unwrap and place the cheese ball on a serving plate. Just before serving, drizzle with balsamic glaze to make it look extra fancy!
Serve with crackers, crostini, or sliced baguette. Mix and match to create an appealing spread!
Chef’s Tips:
- Timing Is Key: The chilling time is crucial; don’t skip it unless you’re in a rush.
- Visual Cues: The mixture should be thick enough to hold its shape when formed into a ball.
- Common Mistakes: Avoid overmixing the ingredients; you still want some texture from the sun-dried tomatoes and onions.
Expert Tips & Tricks
Storage Happiness: The Bruschetta Cheese Ball can be tightly wrapped in plastic wrap and stored in the fridge for up to a week. Just remember to allow it to come to room temperature before serving for the best creamy texture!
Make-Ahead Instructions: Make the cheese ball a day or two in advance, and you’ll be set for last-minute entertaining. Just hold off on the balsamic drizzle until it’s time to serve, as it will make the ball look fresher.
Troubleshooting Tips: If your cheese ball isn’t holding its shape well, try chilling it a bit longer or incorporating a tablespoon of finely shredded cheese to help bind.
Flavor Enhancements: If you want a little kick, consider adding crushed red pepper flakes or some chopped black olives!
Experiment with Herbs: If basil isn’t your thing, try fresh dill or oregano for a different twist.
Serving Suggestions
This Bruschetta Cheese Ball is incredibly versatile and pairs wonderfully with various accompaniments! I love serving it alongside crunchy vegetables like carrots and bell peppers for a fresh touch. Presentation-wise, arrange crackers, a rustic sliced baguette, and some olives around the cheese ball to create a festive platter.
It’s perfect for birthdays, summer barbecues, or even a cozy movie night with friends!
Variations & Substitutions
- Different Flavor Combinations: Swap out the sun-dried tomatoes for roasted red peppers or use feta cheese for a tangier profile.
- Dietary Restriction Adaptations: For a vegan take, replace cream cheese with a plant-based alternative like cashew cream or tofu. Use nutritional yeast for a cheesy flavor.
- Seasonal Variations: In the winter, consider adding cranberries or pecans for a festive flair.
Nutrition & Storage Info
- Prep time: 15 minutes
- Chill time: 2 hours (or overnight)
- Total time: 2 hours 15 minutes
- Yield: About 8-10 servings
- Estimated calories: 150 calories per serving
Storage Instructions:
- Room Temp: Not recommended for extended periods.
- Fridge: Keep well wrapped—up to 1 week.
- Freezer: Freeze (well-wrapped) for up to 2 months.
FAQ Section
Can I use low-fat cream cheese?
Yes, low-fat cream cheese can be used, but the consistency may change slightly, and it may not be as creamy.How long can I keep the cheese ball?
Refrigerated, it will last up to a week, but it’s best enjoyed fresh!Can I make this cheese ball vegan?
Definitely! Use vegan cream cheese and nutritional yeast for that cheesy flavor.Does it have to sit in the fridge for 2 hours?
Chilling helps meld the flavors, but if you’re in a hurry, try to chill for at least 30 minutes.How do I serve leftovers?
Simply refrigerate, and let it come to room temperature before serving again!Can I freeze it?
Yes, but it’s best to consume it fresh as freezing can change the texture.What should I serve it with?
Crackers, crostini, and fresh veggies work wonderfully!What can I do if it’s too salty?
Add a tad of cream cheese to balance it out, or serve with unsalted crackers.Can I use dried basil instead of fresh?
While it’s technically possible, fresh basil gives a much better flavor!How do I know when it’s ready?
Once chilled, it should hold its shape well and be easy to slice or scoop.

Conclusion
In a crowd of ordinary appetizers, this Bruschetta Cheese Ball shines brightly, offering not only breathtaking presentation but also a palette of unforgettable flavors that will leave your guests asking for more. I hope you take the plunge and try this recipe—I promise it’ll become a staple at your gatherings just as it has in mine!
I’d love to hear how you make it your own, so share your stories in the comments below. And don’t forget to check out some of my other delightful appetizer recipes on the blog—there’s so much more deliciousness waiting for you!

Savory Bruschetta Cheese Ball
- Total Time: 135 minutes
- Yield: 8-10 servings 1x
- Diet: Vegetarian
Description
A delightful appetizer featuring a creamy blend of cheeses, fresh basil, and sun-dried tomatoes, perfect for gatherings.
Ingredients
- 8 oz cream cheese, softened
- 1 cup shredded mozzarella cheese
- 1/2 cup grated Parmesan cheese
- 1/4 cup fresh basil, chopped
- 1/4 cup sun-dried tomatoes, chopped
- 1/4 cup diced red onion
- 1 clove garlic, minced
- 1/4 cup balsamic glaze for drizzling
- Salt and pepper to taste
- Crackers or sliced baguette for serving
Instructions
- Bring the cream cheese to room temperature, about 30 minutes before starting.
- In a medium bowl, combine cream cheese, mozzarella, and Parmesan, blending until mostly smooth.
- Fold in basil, sun-dried tomatoes, red onion, and garlic. Season with salt and pepper.
- Shape the mixture into a tight ball and wrap in plastic wrap.
- Refrigerate for at least 2 hours or overnight.
- Unwrap and place the cheese ball on a serving plate, drizzle with balsamic glaze before serving.
- Serve with crackers, crostini, or sliced baguette.
Notes
This cheese ball can be made ahead of time and stored in the fridge for up to a week.
- Prep Time: 15 minutes
- Cook Time: 0 minutes
- Category: Appetizer
- Method: No cooking required
- Cuisine: Italian
Nutrition
- Serving Size: 1 serving
- Calories: 150
- Sugar: 2g
- Sodium: 200mg
- Fat: 12g
- Saturated Fat: 7g
- Unsaturated Fat: 3g
- Trans Fat: 0g
- Carbohydrates: 9g
- Fiber: 1g
- Protein: 8g
- Cholesterol: 30mg
Keywords: bruschetta cheese ball, appetizer, party food, easy recipes, holiday recipes