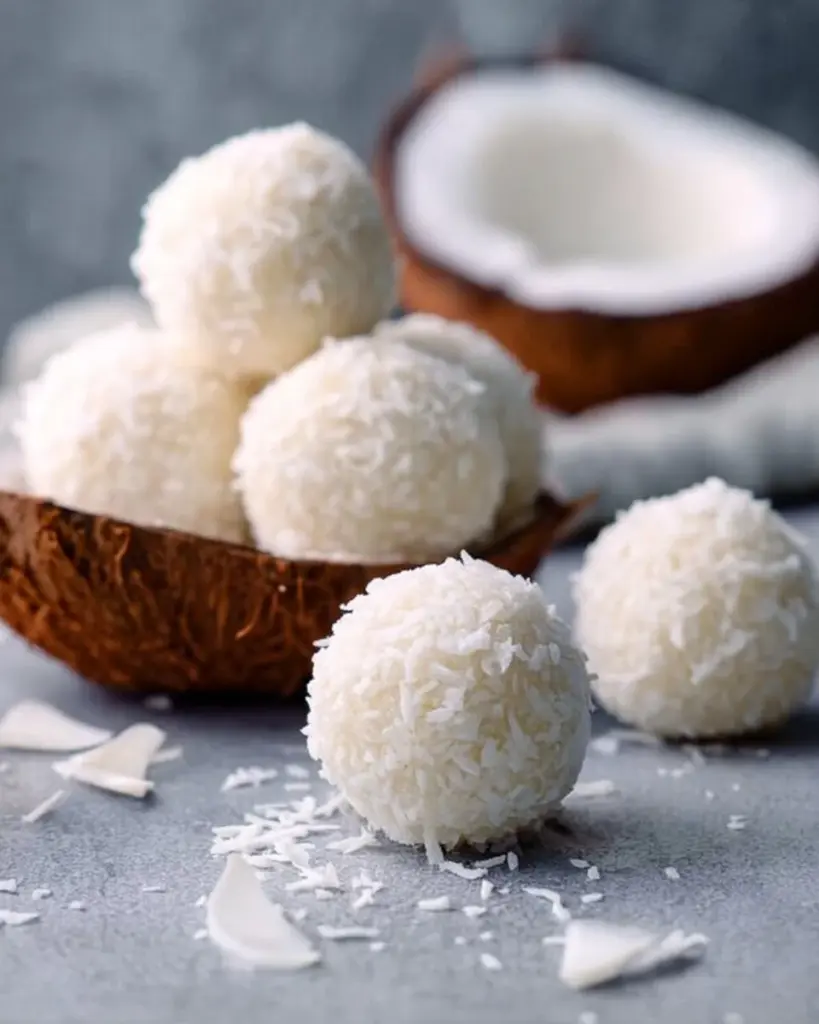
Irresistibly Delicious Coconut Bliss Balls Recipe: The Ultimate Sweet Treat
Have you ever been caught in the whirlwind of life, feeling a little worn out but craving something sweet to put a smile on your face? I remember those long afternoons after school when my mother would whip up a batch of her famous Coconut Bliss Balls. The mere sight of those snowy-white, bite-sized delights would send my siblings and me rushing into the kitchen, where the air was intoxicatingly sweet with hints of coconut and maple syrup.
These Coconut Bliss Balls are more than just a treat; they’re a gateway to family memories, comfort, and pure joy. Unlike many store-bought snacks that leave you wanting more (or worse, filled with questionable ingredients), this recipe uses wholesome, simple ingredients that not only satisfy your sweet tooth but also nourish your body. It’s a sweet experience I bring to my kitchen, and I can’t wait to share the love with you.
In this post, I promise you will learn how to create these delicious Coconut Bliss Balls from scratch, exploring their smooth texture, rich flavor, and the endless possibilities for making them your own. Get ready to roll up your sleeves and embark on a delightful baking journey that will surely make your heart (and taste buds) happy!
What are Coconut Bliss Balls?
Originally inspired by a blend of energy bites and traditional no-bake treats, Coconut Bliss Balls have found their way into the hearts—and kitchens—of many. They boast a luscious, chewy texture thanks to the shredded coconut and almond flour, creating a mouthwatering bite that practically melts in your mouth.
The sweet, nutty essence of these little bites comes alive with the addition of maple syrup, making them delectably sweet without being overly indulgent. Whether you’re needing an afternoon pick-me-up or a wholesome dessert after a family dinner, Coconut Bliss Balls are as versatile as they are tasty.
Perfect for snacking, fueling your workouts, or even as a fun DIY gift, these balls can be made for any occasion. They are unique in their simplicity, requiring just a handful of ingredients and minimal effort—ideal when the craving strikes!
Why You’ll Love This Recipe
Quick and Easy: These Coconut Bliss Balls come together in less than 30 minutes, making them a perfect last-minute treat for gatherings or your own self-care moments.
Healthier Alternative: Unlike store-bought snacks laden with preservatives and artificial flavors, this homemade version allows you to indulge without the guilt, using whole ingredients you can feel good about.
Cost-effective: You can whip up a whole batch for a fraction of the price you’d pay for similar snacks in stores—plus, you can make a larger quantity to enjoy throughout the week!
Customizable: Want to spice things up? This recipe is a blank canvas! You can add in nuts, dried fruit, or even a splash of vanilla. Feel free to experiment with flavors (think dark chocolate chips or a hint of almond extract!).
Minimal Skill Required: If you can mix ingredients and roll them into balls, you’re already on your way to bliss! This recipe is perfect for all skill levels—whether you’re a seasoned baker or a novice in the kitchen.
Ingredients
You’ll need the following simple ingredients to create these Coconut Bliss Balls. Remember, quality counts!
- 1 cup shredded unsweetened coconut: Look for high-quality, finely shredded coconut for the best texture—brands like Bob’s Red Mill or Thailand’s Organic Coconut work wonders!
- 1/2 cup almond flour: I recommend using a finely ground almond flour for a smooth consistency; make sure it’s fresh for maximum flavor.
- 1/4 cup pure maple syrup: The real deal is a must for that rich sweetness. Avoid syrup labeled as "pancake syrup" as they often contain high fructose corn syrup and additives.
Prep Notes
- Ensure your maple syrup is at room temperature for easy mixing.
- If you’re allergic to nuts, you can substitute almond flour with sunflower seed flour!
Step-by-Step Instructions
Mix the Dry Ingredients: In a mixing bowl, combine 1 cup shredded coconut, 1/2 cup almond flour, and 1/4 cup maple syrup. Make sure the coconut and almond flour are well-mixed to avoid clumps. (Visual Cue: The mixture should resemble wet sand.)
Combine Ingredients: Using your hands or a spatula, mix until everything is well incorporated and sticky. Let sit for 5 minutes to let the ingredients blend perfectly.
Shape the Balls: Scoop out small amounts (about 1 tablespoon) of the mixture and roll them between your palms to form smooth balls. (Chef’s Tip: Wet your hands slightly to prevent sticking!)
Arrange the Balls: Place the balls on a baking sheet lined with parchment paper. Keep them about an inch apart for easier handling.
Chill to Set: Refrigerate for at least 30 minutes to set. (Pro Tip: The longer they chill, the firmer they will become, making them perfect for storage!)
Enjoy Your Coconut Bliss Balls: Once they have set, enjoy them as a delightful snack or dessert.
Expert Tips & Tricks
Storage: Store these bliss balls in an airtight container. They can sit at room temperature for a few days but are best kept in the fridge for up to a week or frozen for up to a month.
Make-Ahead Instructions: Feel free to double or triple the batch and freeze them for busy days ahead! They can be taken out as needed, and they’d do well to thaw out at room temperature.
Troubleshooting: If your mixture feels too sticky, add a tablespoon of almond flour; if it’s too dry, a splash of coconut milk or additional maple syrup can help achieve the right texture.
Serving Suggestions
These Coconut Bliss Balls are perfect for various occasions! Pair them with a cup of tea or coffee for a delightful afternoon treat, or serve them on a platter alongside fresh fruit and nuts at your next gathering. They also make fantastic gifts—simply pack them in a cute tin or a mason jar, and you’re all set!
Variations & Substitutions
Flavor Combinations: Try adding a tablespoon of cocoa powder for chocolate-flavored balls or a dash of cinnamon for a warm spice twist. Don’t forget about dried fruits like cranberries or raisins for an added sweetness!
Dietary Adaptations: For those following a vegan stance, ensure that your ingredients are plant-based. These bliss balls are naturally gluten-free, but you can also swap the almond flour for oat flour if you prefer.
Seasonal Variations: Experiment with pumpkin spice or nutmeg in the fall, or add zesty citrus zest for a refreshing summer flavor!
Nutrition & Storage Info
- Prep Time: 10 minutes
- Chill Time: 30 minutes
- Total Time: 40 minutes
- Yield: Approximately 12-15 balls (based on tablespoon size)
- Calories: Roughly 90 calories per ball (exact amount will vary based on sizes)
- Storage Instructions: Keep in an airtight container in the fridge for up to a week or in the freezer for up to a month; they can last at room temperature for 3 days.
FAQ Section
Can I use sweetened coconut? Yes, but it may alter the sweetness level of your final product.
What if I don’t have almond flour? You can substitute it with oat flour or ground walnuts.
Can I add protein powder? Absolutely! Just be mindful to adjust the liquid ingredients accordingly.
How can I make these nut-free? Replace almond flour with sunflower seed flour or oats.
Do I need to refrigerate them? It’s best to keep them refrigerated to maintain freshness, especially longer than a few days.
What’s the best way to roll the balls? Keep your hands slightly wet, and work quickly to avoid sticking.
Can I add chocolate? Yes! Chocoholics can add chocolate chips or coat the balls in melted chocolate.
Can I make these ahead of time? Definitely! They’re perfect for meal prep and last several days in the fridge.
What’s the best way to store them? Keep them in an airtight container in the refrigerator.
Can I make these without maple syrup? You can substitute honey or agave nectar for similar sweetness.
Conclusion
These Coconut Bliss Balls are not just a sweet treat—they’re a slice of nostalgia wrapped in a bite-sized bundle of joy! The simplicity of the ingredients allows their natural flavors to shine through, making them enjoyable for everyone. I encourage you to gather your ingredients, roll up those sleeves, and give this delightful recipe a try!
Your feedback is invaluable—after you’ve made your Coconut Bliss Balls, please share your thoughts and any variations you crafted! Don’t forget to check out other delicious recipes on my blog, like my famous Chocolate Chia Pudding or Easy Peanut Butter Cookies, which are always a hit at family gatherings!
Happy baking! 🥥💖