# Captivating Christmas Pavlova Wreath: A Festive Showstopper Recipe
## Introduction
As the holiday season rolls around, I can’t help but reminisce about the magical moments spent in my grandmother's kitchen, where the scent of freshly baked goodies filled the air. One of my favorite treats was her stunning Christmas Pavlova Wreath. This enchanting dessert, with its delicate meringue and vibrant colors, was always the highlight of our family celebrations. It’s not just a sweet treat; it’s a memory, a conversation starter, and a delightful centerpiece all rolled into one!
What makes my version of the Christmas Pavlova Wreath stand out from the rest? It’s the unique blend of flavors and textures that marry together in this recipe, creating not just a dessert but a holiday experience. With its crispy exterior and soft, marshmallow-like center, each bite takes you on a journey of sweetness and nostalgia. This wreath is a fun twist on the traditional pavlova, vibrant with colors that represent the joy of the season.
In this post, I'm excited to share everything you need to know to create your very own Christmas Pavlova Wreath. You’ll learn about ingredient selection, step-by-step instructions, and expert tips to ensure your dessert is a hit at any gathering. So grab your mixing bowl and let’s embark on this festive baking adventure together!
## What Are Christmas Pavlova Wreaths?
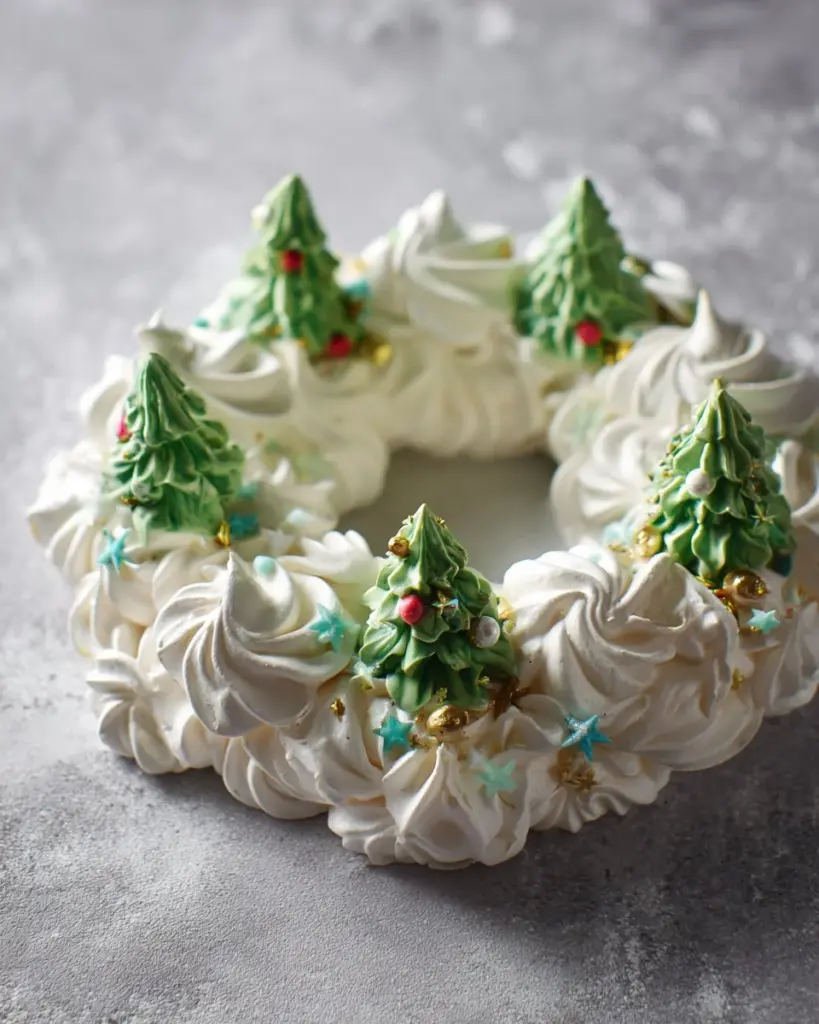
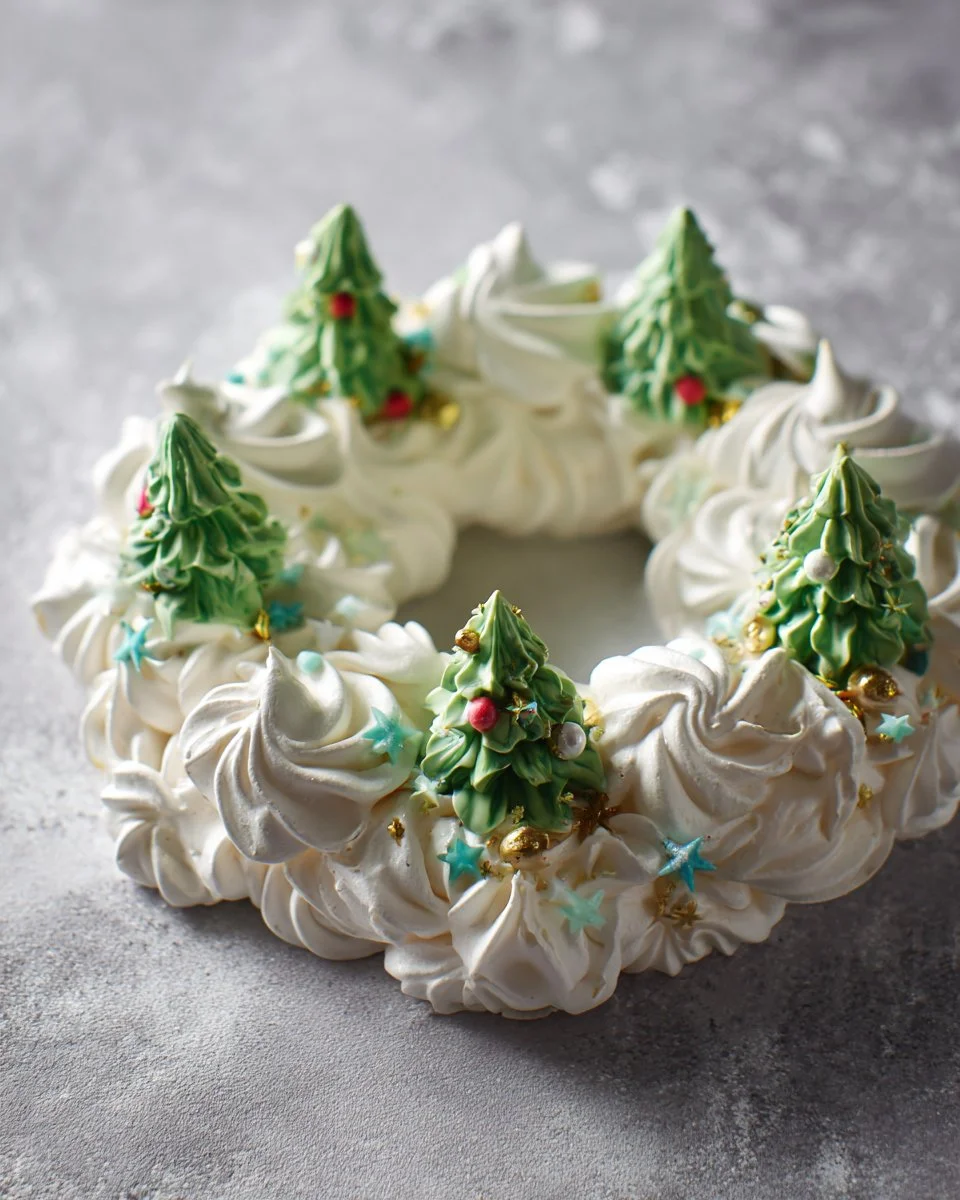
The pavlova, named after the famous Russian ballerina Anna Pavlova, has its origins in Australia and New Zealand, where they took their inspiration from her ethereal beauty. The traditional pavlova is a meringue-based dessert that’s crispy on the outside and soft and fluffy on the inside. However, the Christmas Pavlova Wreath elevates this classic dessert to new heights with its delightful wreath shape, making it a show-stopping centerpiece for festive gatherings.
The taste is akin to sweet clouds—think delicate notes of vanilla with a hint of tanginess from the whipped cream and fruit toppings. It’s light yet indulgent, providing the perfect contrast to the heavier holiday meals we all love. You can whip it up for Christmas gatherings, New Year's parties, or simply as a sweet treat during the festive season.
## Why You'll Love This Recipe
1. **Unique Presentation**: Your guests will be enchanted by the wreath shape adorned with festive colors. It’s a feast for the eyes, and who doesn’t love a dessert that doubles as decor?
2. **Customizable Flavors**: Whether you want a classic vanilla meringue or a hint of citrus zest, this recipe allows for personalization. You can choose seasonal fruits to decorate, like cranberries, kiwis, or pomegranate seeds, making it uniquely yours!
3. **Cost-Effective Delight**: With basic pantry staples like egg whites and sugar, paired with some fruits, this dessert is a budget-friendly option that elevates your holiday spread without breaking the bank.
4. **Easier than It Seems**: While it may look like a challenging feat, making a pavlova is surprisingly simple, especially with the detailed steps in this guide. You’ll impress your family and friends with minimal stress.
5. **Make Ahead**: This beauty can be made a day in advance, giving you more time to enjoy the festivities. Just assemble the components and store them separately, then put everything together before serving.
## Ingredients
{image_template}
- **6 large egg whites**, room temperature (Ensure they're at room temperature for optimal whipping)
- **0.5 teaspoon cream of tartar**
- **300 g superfine sugar** (This sugar dissolves easily and adds a lovely texture; if unavailable, use granulated sugar)
- **1 tablespoon cornstarch** (Helps to stabilize the meringue)
- **Green gel food coloring** (For festive flair; a little goes a long way)
- **Sprinkles** (Use a mix of your favorite festive decor for that holiday sparkle)
**Prep Notes:**
- Make sure your mixing bowls and equipment are grease-free for the best results. Any residue can affect the meringue's ability to whip up properly.
- Consider using brands like **C&H Sugar** for a smooth finish in your meringue.
## Step-by-Step Instructions
1. **Prep Your Bowl**: In a large mixing bowl, beat the egg whites on high speed until they reach soft peaks, about 4-5 minutes. Make sure the bowl is impeccably clean.
**Chef's Tip**: Ensure no yolk gets into the whites; a single drop can impede the whipping process.
2. **Add Stabilizers**: Sprinkle in the cream of tartar while mixing to help stabilize the egg whites.
3. **Mix Sugar and Cornstarch**: In a small bowl, stir together the superfine sugar and cornstarch. With the mixer still on high speed, sprinkle the sugar mixture into the egg whites one spoonful at a time. Continue to beat until the meringue becomes glossy and can hold stiff peaks—about another 5 minutes.
**Common Mistake**: If your meringue is too runny, continue beating at high speed until it thickens.
4. **Add Color**: Divide a few spoonfuls of meringue into small bowls and mix in the green gel food coloring. You can create multiple shades if you wish!
5. **Preheat the Oven**: Preheat your oven to 250°F (120°C).
6. **Prepare the Baking Sheet**: With a pencil, trace a 6-inch circle on the back of a sheet of parchment paper. Place the parchment on your baking sheet.
7. **Pipe the Meringue**: Following the circle traced on the parchment, pipe swirls of white meringue to create the outer edge of the wreath. Then, repeat with a second layer on top of the first ring.
8. **Add the Evergreen Touch**: Using the green colored meringue, pipe little trees or decorative shapes around the wreath.
9. **Sprinkle Decor**: Add festive sprinkles to your meringue. Larger sprinkles can be added after baking with a dab of melted chocolate if you prefer them intact.
10. **Bake**: Bake in the preheated oven for 1.5 hours or until the walls feel dry and hard. When finished, turn off the oven and let the pavlova cool inside for about 30 minutes.
11. **Cool Completely**: Remove it from the oven and let it finish cooling completely on a wire rack.
12. **Serve**: Serve as is or with whipped cream and fresh fruits on the side.

## Expert Tips & Tricks
- **Humidity Alert**: Meringue is sensitive to humidity. If it’s a rainy day, consider waiting until the weather is dry to make your pavlova to avoid chewiness.
- **Storage**: Leftovers can be stored in an airtight container at room temperature for up to 2 days. Avoid refrigerating, as this can make the meringue weep.
- **Make Ahead**: The meringue can be baked a day ahead. Just assemble with whipped cream and fruits just before serving.
- **Troubleshooting**: If your pavlova cracks during baking, don’t panic—it adds to its rustic charm!
## Serving Suggestions
Serve your Christmas Pavlova Wreath alongside rich whipped cream and a colorful array of fresh fruits like berries, passion fruit, or citrus slices. A dusting of powdered sugar or drizzle of chocolate can elevate its appeal. This dessert is perfect for Christmas dinners, festive brunches, or even as a delightful surprise for a New Year’s Eve party.
## Variations & Substitutions
- **Flavor Profiles**: Swap the vanilla extract for almond or lemon extract for an unexpected twist.
- **Dietary Adaptations**: For a dairy-free option, top the pavlova with coconut cream instead of whipped cream.
- **Seasonal Fruits**: Depending on availability and preference, you can opt for autumn flavors like pears, or stick with classic winter fruits like citrus.
## Nutrition & Storage Info
- **Prep Time**: 30 minutes
- **Cook Time**: 1.5 hours
- **Total Time**: 2 hours
- **Yield**: Serves 8-10
- **Estimated Calories**: 150 calories per serving (varies based on toppings)
**Storage Instructions**: Keep your pavlova at room temperature in an airtight container. Best enjoyed within 2 days for the crispiest texture.
## FAQ Section
1. **Can I use pasteurized egg whites?**
- Yes, pasteurized egg whites can be used directly as they’re safe and will whip well.
2. **Why did my pavlova collapse?**
- This can happen if the meringue was under-whipped or if it was exposed to moisture.
3. **Can I use fruit preserves instead of fresh fruit?**
- Absolutely! If fresh fruit isn’t available, fruit preserves or compotes can add great flavor.
4. **How do I know when the meringue is done?**
- It should feel dry on the outside and firm enough to lift off the parchment easily.
5. **Do I have to bake it at low temperature?**
- Yes, baking at a low temperature ensures the inside remains soft while the outside dries out.
6. **Can I make it without cornstarch?**
- Cornstarch helps stabilize the meringue; however, you can substitute with an equal amount of powdered sugar if needed.
7. **What’s the best way to store leftovers?**
- Store in an airtight container at room temperature; refrigerating can make it soggy.
8. **Can I freeze the pavlova?**
- While freezing is not recommended due to changes in texture, you can freeze the meringue shells separately before assembling.
9. **What toppings work best?**
- Seasonal fruits like berries, citrus slices, or even chocolate sauce work beautifully.
10. **How can I make it more festive?**
- Add edible glitter or candy canes as decorative toppings for added holiday cheer!
## Conclusion
This Christmas Pavlova Wreath is more than just a dessert; it’s a chance to share love, memories, and joy with your family and friends during the holidays. I can promise you that overwhelming praise will follow if you give this recipe a try! If you make it, I’d love to hear your thoughts in the comments.
Looking for more holiday recipes? Be sure to check out my Gingerbread Cookies and Peppermint Bark recipes for more festive inspiration!
Christmas Pavlova Wreath
- Total Time: 120 minutes
- Yield: 8-10 servings 1x
- Diet: Gluten-Free
Description
A stunning dessert featuring a delicate meringue wreath, adorned with festive colors and topped with whipped cream and seasonal fruits.
Ingredients
Scale
- 6 large egg whites, room temperature
- 0.5 teaspoon cream of tartar
- 300 g superfine sugar
- 1 tablespoon cornstarch
- Green gel food coloring
- Sprinkles
Instructions
- In a large mixing bowl, beat the egg whites on high speed until they reach soft peaks, about 4-5 minutes.
- Sprinkle in the cream of tartar while mixing.
- In a small bowl, stir together the sugar and cornstarch. Gradually add this mixture to the egg whites while beating until glossy and stiff peaks form.
- Divide some meringue and mix in green food coloring.
- Preheat the oven to 250°F (120°C).
- Trace a 6-inch circle on parchment paper and place it on a baking sheet.
- Pipe white meringue following the circle, creating an outer edge.
- Pipe green meringue shapes decoratively around the wreath.
- Add festive sprinkles.
- Bake for 1.5 hours until dry; let cool in the oven for 30 minutes.
- Cool completely on a wire rack.
- Serve with whipped cream and fresh fruits.
Notes
For best results, ensure mixing utensils are grease-free. Meringue is sensitive to humidity.
- Prep Time: 30 minutes
- Cook Time: 90 minutes
- Category: Dessert
- Method: Baking
- Cuisine: Australian/New Zealand
Nutrition
- Serving Size: 1 serving
- Calories: 150
- Sugar: 30g
- Sodium: 5mg
- Fat: 0g
- Saturated Fat: 0g
- Unsaturated Fat: 0g
- Trans Fat: 0g
- Carbohydrates: 38g
- Fiber: 0g
- Protein: 3g
- Cholesterol: 0mg
Keywords: Pavlova, Christmas dessert, holiday baking, festive treats, meringue