Irresistible Butternut Squash Scones: A Cozy Bake for Fall
As the leaves turn golden and the air gets crisp, my kitchen transforms into a haven filled with the comforting scents of fall—cinnamon, nutmeg, and warmth. One of my all-time favorite traditions in this season is baking Butternut Squash Scones, a recipe that holds a special place in my heart. I remember the first time I made them with my grandmother; her laughter echoed through the kitchen as flour dusted our cheeks. These scones became a family staple, often paired with warm tea during our cozy afternoon gatherings.
What sets my Butternut Squash Scones apart from others is their incredibly moist texture and rich flavor. Unlike dry, crumbly scones you might find at a coffee shop, these are infused with roasted butternut squash, which adds natural sweetness and a delightful softness. Plus, the addition of warming spices makes every bite feel like a hug. Trust me when I say, you’ll find yourself reaching for seconds—and thirds!
In this post, I’ll guide you through every step of creating these delightful scones, sharing tips, tricks, and personal insights that will have you baking like a pro in no time. Let’s dive in and embrace the magic of fall with your very own batch of Butternut Squash Scones!
What Are Butternut Squash Scones?
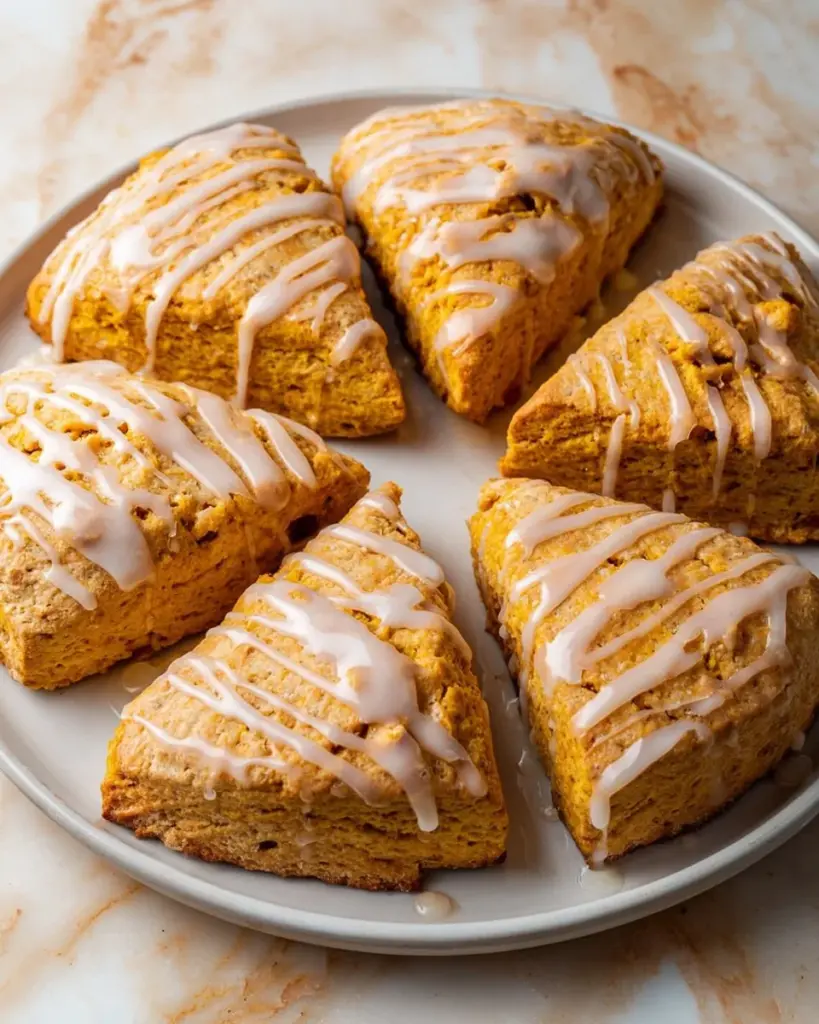
Butternut Squash Scones have a humble yet rich origin tied to traditional English scones, a beloved treat often served with tea. Over the years, bakers have gotten creative, and adding butternut squash to the mix breathes new life into this classic recipe. The earthy sweetness of roasted squash naturally enhances the scone’s flavor while providing a beautiful orange hue that makes them visually appealing.
These scones are tender and flaky, with a slight crispness on the outside and a moist, soft interior. Imagine biting into a warm scone, the scent of cinnamon and nutmeg wafting through the air as the rich flavor of squash dances on your palate—pure bliss! They are perfect for breakfast, brunch, or an afternoon snack, making them a versatile treat for any occasion. You might even find that they disappear before lunchtime!
Why You’ll Love This Recipe
Ditch the Store-Bought: These Butternut Squash Scones are not just tastier but healthier than those pre-packaged ones filled with preservatives. Plus, they are incredibly easy to make at home and more affordable than splurging on gourmet bakery versions!
Cost-Effective Goodness: With budget-friendly ingredients, you can whip up a batch of these delightful scones without breaking the bank. Just think of the enjoyment you’ll have, all while saving money!
Endless Customization Options: Feel free to get creative with these scones! Want to add pecans for crunch? Go ahead! Cranberries for a tangy twist? Yes, please! You can easily adjust the spices or add toppings to suit your taste.
Perfectly Simple: This recipe is super approachable, even for novice bakers. With straightforward steps, you’ll have a stunning batch in about 30 minutes—perfect for a last-minute gathering!
Warm Memories: Baking these Butternut Squash Scones can become your new favorite family tradition. Imagine the wonderful smells wafting through your home as you bake with your loved ones, creating memories that will last a lifetime.
Ingredients
To make these comforting Butternut Squash Scones, you’ll need the following ingredients, thoughtfully selected for quality:
- 2 cups all-purpose flour (King Arthur is my go-to brand for consistent results)
- 1/3 cup light brown sugar, packed (adds lovely caramel notes)
- 2 tsp baking powder (to help them rise)
- 1/2 tsp baking soda (balances the acidity of the squash)
- 1/2 tsp salt (enhances overall flavor)
- 1 tsp ground cinnamon (for that warm, cozy spice)
- 1/4 tsp ground nutmeg (great seasonal addition)
- 1/2 cup unsalted butter, cold and cubed (room temperature or softened butter won’t give you that perfect flakiness, so chill well!)
- 1 cup mashed roasted butternut squash (freshly roasted squash is best; avoid canned for the best flavor)
- 1/4 cup whole milk (adds moisture)
- 1 large egg (for richness)
- 1 tsp vanilla extract (a splash goes a long way)
- 1/2 cup powdered sugar (optional for glaze) (for a sweet finish)
- 1-2 tsp milk (optional for glaze) (to thin down the icing if necessary)
- Dash of cinnamon (optional for glaze) (to complement the scones)
Prep Notes:
- Butter: Using cold butter is key to achieving the flaky texture of the scones.
- Squash: If you’re making your own mashed squash, roast it ahead of time to allow for cooling before you mix it into the dough.
Step-by-Step Instructions
Ready to bring these Butternut Squash Scones to life? Grab your apron and let’s get started!
Preheat the Oven: Begin by preheating your oven to 400°F (204°C), and line a baking sheet with parchment paper. This will ensure even baking and prevent sticking.
Mix Dry Ingredients: In a large mixing bowl, whisk together 2 cups of all-purpose flour, 1/3 cup light brown sugar, 2 tsp baking powder, 1/2 tsp baking soda, 1/2 tsp salt, 1 tsp ground cinnamon, and 1/4 tsp ground nutmeg until well combined.
Cut in the Butter: Cut in the cold butter until the mixture resembles coarse crumbs. I like to use a pastry cutter for this step, but you can also use your fingertips (just work quickly to keep the butter cold).
Combine Wet Ingredients: In a separate bowl, whisk together 1 cup mashed roasted butternut squash, 1/4 cup whole milk, 1 large egg, and 1 tsp vanilla extract until smooth. It’s okay if the squash is a bit chunky—for added texture!
Create the Dough: Pour the wet mixture into the dry ingredients and gently mix until just combined. Avoid overmixing, as this will affect the scones’ texture.
Shape the Scones: Transfer the dough to a well-floured surface. Pat it into a 1-inch thick round disk and cut into 8 wedges. You can also use a biscuit cutter for fun shapes!
Bake: Place the scones on the prepared baking sheet and bake for 20-22 minutes, or until golden brown. Keep an eye on them; they should rise nicely and have a golden crust.
Cool and Glaze: Allow them to cool slightly on a wire rack. For the glaze (optional), mix together 1/2 cup powdered sugar, 1-2 tsp milk, and a dash of cinnamon until smooth. Drizzle this over the still-warm scones for a sweet finish.
Serve: These scones are best enjoyed warm or at room temperature. They pair beautifully with butter, jam, or your favorite tea!
Chef’s Tips:
- Timing: Make sure you keep an eye on the baking time; ovens can vary!
- Common Mistakes: Overmixing the dough can lead to tough scones. Less is more when mixing!
Expert Tips & Tricks
Storage Recommendations: To keep the scones fresh, store them in an airtight container at room temperature for up to 2 days. For longer storage, you can freeze them for up to a month.
Make-Ahead Instructions: You can prepare the dough in advance and cut out the scones. Place them on a baking sheet and freeze until firm, then transfer to a freezer-safe bag. Bake straight from frozen, adding a couple of extra minutes to the baking time.
Troubleshooting: If your scones seem flat, check your baking powder and baking soda—they should be fresh to ensure a good rise!
Flavor Boost: Want to elevate the flavor? Try adding a teaspoon of orange zest or finely chopped herbs like rosemary for a unique twist.
Use Seasonal Variations: Feel free to swap out the butternut squash for other roasted veggies like sweet potatoes or pumpkin, adjusting spices accordingly.
Serving Suggestions
Pair your Butternut Squash Scones with a dollop of clotted cream or a homemade jam for an extra touch of indulgence. I also love serving them alongside a warm cup of spiced chai tea or apple cider, making them the perfect treat to share during a cozy fall gathering. Want to impress at brunch? Arrange them on a pretty platter, dust them with a little powdered sugar, and watch your loved ones swoon!
Variations & Substitutions
Get creative! Here are a few variations and substitutions to try:
- Nutty Delight: Add 1/2 cup of chopped walnuts or pecans for a delightful crunch.
- Chocolate Lovers: Toss in some dark chocolate chips or butterscotch chips for a slightly sweet twist.
- Gluten-Free Option: Substitute all-purpose flour with a 1:1 gluten-free baking blend.
- Vegan-Friendly: Replace the egg with a flax egg (1 tablespoon flaxseed meal mixed with 2.5 tablespoons water) and swap out the butter for a plant-based alternative.
Nutrition & Storage Info
- Prep Time: 10 minutes
- Cook Time: 20-22 minutes
- Total Time: 30-35 minutes
- Yield: 8 scones
- Estimated Calories Per Serving: 180 calories (depending on ingredient choices)
Storage Instructions:
- Room Temp: Store in an airtight container for up to 2 days.
- Fridge: Not necessary but can last up to 5 days.
- Freezer: Freeze individually for up to 1 month. Reheat in a 350°F (175°C) oven when ready to enjoy!
FAQ Section
Can I make these scones with fresh butternut squash?
- Absolutely! Roast fresh butternut squash until tender, then mash it for the recipe.
What if I don’t have whole milk?
- You can substitute it with any milk you have on hand—almond, oat, or even 2% work great.
How do I know when the scones are done?
- They’re done when they’re golden brown on top and a toothpick inserted comes out clean or with just a few crumbs.
Can I double this recipe?
- Yes! Just be sure to use a large enough mixing bowl to accommodate all the ingredients.
What’s the best way to reheat them?
- Reheat in an oven to help regain their original texture instead of a microwave, which can make them a bit soggy.
Can I use pumpkin instead of butternut squash?
- Yes, pumpkin puree works well, but make sure it is not the spiced pie filling.
How can I make them sweeter?
- Increase the brown sugar slightly or add a sprinkle of sugar on top before baking.
Are they good for freezing?
- Yes! They freeze beautifully, just wrap them well to prevent freezer burn.
Do I have to glaze the scones?
- The glaze is optional! They’re delicious on their own too.
What’s the best way to serve them?
- Enjoy them warm, with a side of butter or jam, and your favorite hot beverage.
Conclusion
There you have it! My beloved Butternut Squash Scones are the ultimate comfort treat for any fall gathering—or simply a cozy moment at home. The memories made while bakingthese beauties will stay with you, just as they have with my family. I can’t wait for you to try this recipe! Let me know how yours turn out in the comments, and feel free to share your own twists and additions. For more delicious fall recipes, explore my blog’s collection—let’s keep our kitchens warm and inviting together!
Happy baking!
Print
Irresistible Butternut Squash Scones
- Total Time: 32 minutes
- Yield: 8 scones 1x
- Diet: Vegetarian
Description
Delightfully moist and flavorful scones infused with roasted butternut squash and warming spices, perfect for fall gatherings.
Ingredients
- 2 cups all-purpose flour
- 1/3 cup light brown sugar, packed
- 2 tsp baking powder
- 1/2 tsp baking soda
- 1/2 tsp salt
- 1 tsp ground cinnamon
- 1/4 tsp ground nutmeg
- 1/2 cup unsalted butter, cold and cubed
- 1 cup mashed roasted butternut squash
- 1/4 cup whole milk
- 1 large egg
- 1 tsp vanilla extract
- 1/2 cup powdered sugar (optional for glaze)
- 1–2 tsp milk (optional for glaze)
- Dash of cinnamon (optional for glaze)
Instructions
- Preheat your oven to 400°F (204°C) and line a baking sheet with parchment paper.
- In a large mixing bowl, whisk together the flour, brown sugar, baking powder, baking soda, salt, cinnamon, and nutmeg until combined.
- Cut in the cold butter until the mixture resembles coarse crumbs.
- In a separate bowl, whisk together the mashed roasted butternut squash, milk, egg, and vanilla extract until smooth.
- Pour the wet mixture into the dry ingredients and gently mix until just combined.
- Transfer the dough to a floured surface, pat it into a 1-inch thick round disk, and cut into 8 wedges.
- Place the scones on the prepared baking sheet and bake for 20-22 minutes, until golden brown.
- Cool slightly on a wire rack, then for the glaze mix powdered sugar, milk, and cinnamon until smooth and drizzle over the warm scones.
Notes
For the best flakiness, use cold butter and do not overmix the dough.
- Prep Time: 10 minutes
- Cook Time: 22 minutes
- Category: Snack
- Method: Baking
- Cuisine: American
Nutrition
- Serving Size: 1 scone
- Calories: 180
- Sugar: 8g
- Sodium: 200mg
- Fat: 8g
- Saturated Fat: 5g
- Unsaturated Fat: 3g
- Trans Fat: 0g
- Carbohydrates: 25g
- Fiber: 1g
- Protein: 3g
- Cholesterol: 30mg
Keywords: butternut squash scones, fall baking, cozy recipes, scones, autumn treats